Search This Blog

Friday, October 29, 2010

Oatmeal-Chocolate Chip Cookies...

I have blogged about gluten free chocolate chip cookies before. A recipe given to me by a dear friend. But, I am always trying to find ways to add nutrients that is meaniful to foods that I eat, yes—even the indulgent foods. These are the same chocolate chip ones I love, but "nutritionized" just a bit.

They do have sugar, so I do not recommend these every day, however the addition of oatmeal to these cookies adds a relevant dose of fiber and protein to a really good treat. The oatmeal is great, because it gives them a rustic, bumpy-crackly texture, plus the oatmeal also keeps them soft, and adds a satisfying chewiness to the cookie.


Oatmeal-Chocolate Chip Cookies

  • ¾ cup softened butter (1.5 sticks)
  • 1 ¼ cup packed brown sugar
  • ¼ cup white sugar
  • 2 eggs
  • 1 tsp. vanilla
  • 2 ¼ cup Tom Sawyer GF Flour (or your own gluten free flour blend)
  • 1 tsp baking soda
  • 1/2 tsp kosher salt
  • 1 bag (about 11.5 oz chocolate chips, 60% cacao.)
  • ¼ cup flax meal
  • 1 cup rolled oats (not instant or quick cook)
Directions

Heat oven to 375-degrees F. Cream butter and sugars till smooth. Add eggs, salt and vanilla. Blend till smooth. Add flour and baking soda and beat until incorporated. Add chocolate chips and oats and fold into batter.

Drop onto a lined baking sheet (I use parchment paper) in 1 tbs. drops. These spread, so don't put them too close together. Bake for 10-minutes until edges are light brown. Let cool on pan for 5 minutes, them move to a rack to cool completely.

Monday, October 18, 2010

Gluten free weeknight "Risotto"...

I came home last night and decided I needed a bit of Fall in my kitchen. With record temperatures (still soaring) here in sunny AZ, I just needed to embrace the coming of the season. So, what does one do with a big, round, beautiful butternut squash from the Farmshare sitting on one's counter?—Well, one makes a butternut squash risotto (of course!).
Don't fear, this is not your daunting 40-minute risotto. Oh, no—this is your one pot, 15-minutes risotto, and who doesn't have fifteen minutes?
This is a great dish for vegetarian night at your house, or, if those don't occur at your house, add diced leftover chicken or meat, or shimp to this at the end (also great with scallops!)
This dish is delicious. The risotto is creamy, so you don't miss the butter and cream a traditional recipe has. The goat cheese add a delicious tang, and richness, so you still feel satisfied without any meat in the dish. Plus goat cheese is a healthy cheese, you can feel good about it! The squash retains just enough bite to be satisfying, but melts away as you eat it. And sage, well that just is fall, isn't it?
Here is how it goes:

  • 2 tbs olive oil
  • 1 butternut squash, peeled and diced (about 2 cups or so)
  • 1 medium onion, diced
  • 2 tbs fresh sage (or 1 tbs of dried)
  • 4 oz. of goat cheese*
  • 2 tbs of evaporated milk (or regular milk, or soy or rice milk, use what you have.)
  • 1.5 cups of rice (use a short cooking rice, like Jasmine)
  • 3 cups liquid (this can be broth, water, or combo).
  • Salt and pepper
In a large, heavy-bottom saute pan over medium-high heat, add 2 tbs olive oil and saute the onion and squash, about 8 minutes until it starts to become tender. Salt and pepper as you go. Then add rice. Stir. Add liquid, stir again and cover with a lid. Cook for another 8 minutes or so, stirring a few times until the liquid is gone and rice is tender. Remove pan from heat and add the goat cheese. Stir it in as it melts. Add the 2 tbs of milk at the end, and stir in the sage. Taste, then season with salt if needed.

*If going dairy-free, omit goat cheese, but add 1 tbs white vinegar to add the tangy-roundness it provides.

Sunday, October 10, 2010

Easy Gluten-Free Brownies

I had a hankering for a brownie the last night. Homemade brownies really are very simple. Many people don't think so however. So I began to ponder, "What are the barriers to any level cook whipping up a homemade thing when they get a taste for it?" I came up with these barriers: ingredients, time, skill, and recipes.
Well—I have to say, all of those barriers can be swiftly and delightfully broken down—leaving no excuse to not fulfill a homemade brownie craving on a random Saturday night a 8:46 pm. Now, I am not all about junk food, and these brownie have a ton of cocoa powder, which provides antioxidants, fiber and protein. So they have intent—even if being a sweet treat.
Let's tackle those barriers now, shall we?


Ingredients: we all have butter (no need for it to be softened) it can come right from the freezer (where I keep mine.) We all have chocolate chips, in some capacity, we have eggs and cocoa. Other than sugar, you don't even need leavening, its all things you have in the pantry...I bet if you looked, you would have what you need to make these right now! And time, well, start to finish into the oven was 11 minutes. Ok people, that is 2 sets of TV commercials! Skill: none needed, if you can read a recipe, you can do this. And finally I come to recipe. With the good old Internet, there are a million recipes to be Googled in a moment's notice! However my preference is this gal, Donna Hay. Buy her books used on Amazon very inexpensivly. I love her recipes because they are simple, fast, and they all convert beautifully to gluten free. Invest in some of her books.  She gets credit for this brownie. I just made it GF.

Rich Chocolate Brownies-Inspired by Donna Hay's Recipe
  • 6 oz. butter
  • 6 oz. chocolate chips (I use 60% chips. Use what you like. The higher the %, the better for you).
  • 3 eggs
  • 1 1/4 cup white sugar
  • 2/3 cup gluten free flour (I use Tom Sawyer's, use what you have)*
  • 1/2 cup + 2 tbs cocoa powder
  • Additional 1/2 cup of chocolate chips

*Non-gluten free folks, use white or whole wheat flour to make these.

Preheat your oven to 350-degrees F. Melt the butter and the 6 oz. chocolate chips in a sauce pan over low heat. When melted take off heat to cool. While its cooling, place eggs and sugar in a mixer and beat on high until fluffy and creamy. Turn the mixture to low, and slowly drizzle in the cooled chocolate mixture. Add the cocoa and the GF flour, mix in on slow until blended. Then stir in the 1/2 cups of chocolate chips.
Pour mixture into a 9-inch square pan (I don't even line the pan, these are for eats and not show, so make it easier on yourself.)
Bake for 35-40 minutes until set. Allow to cool, then cut.

Warm from the oven, these are light as air, with a soft crumb and moist texture. Place in the fridge, and when cooled—becomesa dense rich brownie that is chewy and fudge-like.

Thursday, September 30, 2010

No fuss pot roast...

We all make pot roast, right? At least our mothers did, or of course, our grandmothers. I cannot say that I really recall pot roast in our home. We had casseroles, and things called "Bacon & Cheese Get-Togethers."-Imagine—egg salad, with bacon, topped with cheddar cheese—all paced atop an open hamburger bun, then baked until the cheese was all melty and bubbly. I did love them.
Comfort food in our house growing up had names like, "Chicken & Broccoli Casserole:, or, "Louisiana Shrimp-Bake"...my mother was a product of Betty Crocker's formative years in the kitchen for the woman who liked to cook. My mother was—and is a great cook. Not fancy, but great. But we never had pot roast. Therefore, as all women are products of their environment (and their mothers) I also do not make pot roast. I really was not sure why, other than I did not grow up with it, and so chatting with a coworker today, we discussed that—if we were to be honest with ourselves, we didn't really 'love' pot roast, while an easy crock pot meal, it could often be very dry. And it's true, while many love it, and it is a quintessential Americana dish—truth be told, it can be very dry.


It is a fairly ‘easy’ dish on the difficulty level of cooking, but it can get fussy. “Sear the roast”, then “sauté the onions” then “add it to the crock pot”…Well, for me—not so much with the fuss sometimes.
So, last week pot roast was on sale, and as I stood at the meat counter in a quandary over, “Should I?” I decided to opt-in and put the roast in my cart.
Not knowing quite where to begin, I decided I would try first with a no-fuss method. Well, it worked great, first try out.
This roast came out juicy—not dry, and tender. The crust was just enough peppery warmth on the tongue to stimulate the senses, and the tomato sauce was thick and rich enough to stick to the succulent chunks of roast. The onions turned sweet and melted in your mouth with each bite. And it took only 7-minutes prep time the night before to have a wonderful meal when I got home the next day.
Here is how it is done:
• 1.5 to 2 lb pot roast
• 1 large onion, cut into a small dice, or just slices
• 1 small can tomato paste
• ½ cup water
• 2 tsp salt
• 2 tsp pepper

 
Tip: add a few potatoes or sweet potatoes, whole, to the crock pot for a great side dish to go with it. They cook right along with it perfectly.

 
The night before, line your crock pot with foil (critical for easier clean up). Then, layer on the bottom of the crock pot your onions, then add the tomato paste on top of the onions. Add the water. Place the roast on top of that, and mix together the salt and pepper and press it into the top of the roast—like a crust. Lid and place prepared crock in the fridge overnight.

In the morning, put the crock in the base and turn on low. Mine was on for 10-hours, a typical work day.

Sunday, September 19, 2010

Garden Evangelist...

I have said before, "Everyone should grow something..." And I really think this is true. A few years back I started having "Seed Planting Parties." The parties started as a way for some gardening gals to prep their seeds for the season. But each year I invite a few new folks. I tell people, you can have plots (a dedicated garden area in the ground) or pots (simple container gardening on a patio). I invite whoever I think would enjoy it. And some say "I don't garden," and I say, "Come anyway for brunch!" And it never fails, they end up finding the seed preparation process enjoyable and going home with at least an herb or two to try out their gardening skills for the first time.
Plus, we eat! This year I had a Fall Seed Party for the first time. And AZ had record temps for the first time since 1980 (107-degrees). So, I may just stick to my Spring parties from now on.
But this year was great! We shared our successes and challenges from last years growing season—"What does a broccoli flower look like?", "My peppers just did not do well this year, did yours?", "Did you know, that if you let arugula flower, you can harvest the seeds pods for next year?" We all share tips and tricks, and advice for the new gardeners in attendance. Everyone goes home toting their seeds bags full of a treasure of seeds just waiting to burst forth into a bounty for the table in just a few short  months.
I have shared my menu below—maybe it will inspire you to host a seed planting party, and gain some gardening coverts in your community.

Make your own menu, or be inspired by the one below.
What we enjoyed for brunch:
Some of the cupcake pics for fun...

Saturday, September 11, 2010

Buttermilk biscuit french toast...

What to do with leftover buttermilk biscuits. Now, I suppose that phrase "leftover buttermilk biscuits" is a bit of an oxymoron...after all, who in the world would ever have leftover homemade buttermilk biscuits?
When we make them, we never do—usually. We did this weekend. It's my buttermilk sage biscuit recipe, minus the sage this time. We ate them warm, right from the oven, with cold butter. But we had a few leftover. So, I wondered, "what should I do with them?" The options are endless; make gravy for them, or split, steam and fill with fried egg and a slice of ham, or split, toast and eat with fig jam.
Instead, I thought—why not make french toast, but with a biscuit? So, I split them, soaked them in a simple french toast custard and voila! French toast from a buttermilk biscuit.


  • 4 biscuits, split in half
  • 2 eggs
  • Splash of milk or cream
  • Cinnamon

Split your biscuits in half, and make whatever your usual french toast mixture of egg is...(I use eggs, some cream or milk and some cinnamon—whisk it in a shallow dish for soaking.) Soak the biscuits in the egg mixture. Soak them longer than you would bread, the biscuits are dense, and need extra time to soak it up.
Then fry in a medium-high skillet in a little butter until browned.
Serve these with a little sweetened condensed milk drizzled over top (divine!!) or syrup.

Sunday, September 5, 2010

Sweet potato fries...

When I first married, my husband announced that he was not one who enjoyed potatoes. "All potatoes?" I asked. "Anything potato," he states. Imagine my dismay when my newly found culinary mission (to faithfully feed and satisfy a new husband) now had one key kitchen ingredient taken completely off the table. I mean, the potato is a foodies blank slate. You can do so many things with it! One could make potatoes seven-days a week, seven-different ways and a person would not necessarily feel overwhelmed by potato.
So, what now?—I thought to myself. This meant no mashed potatoes, no scalloped potatoes, no au-gratin, or potato gratins,  no frittata’s with a potato crust, no roasted-salted baby potatoes with garlic aioli...
For goodness sake, I grow potatoes! I love them myself, so I knew I had to find a way to make them enjoyable for him. The husband did say that a crispy-thin French fry was–on occasion–acceptable to his palate. I ran with it.
I began to make baked shoestring French fries, in the oven, so they are healthy, because they are baked and not fried. Plus made with olive oil, the olive oil is good for you.
We eat them now with regularity, several times a month.
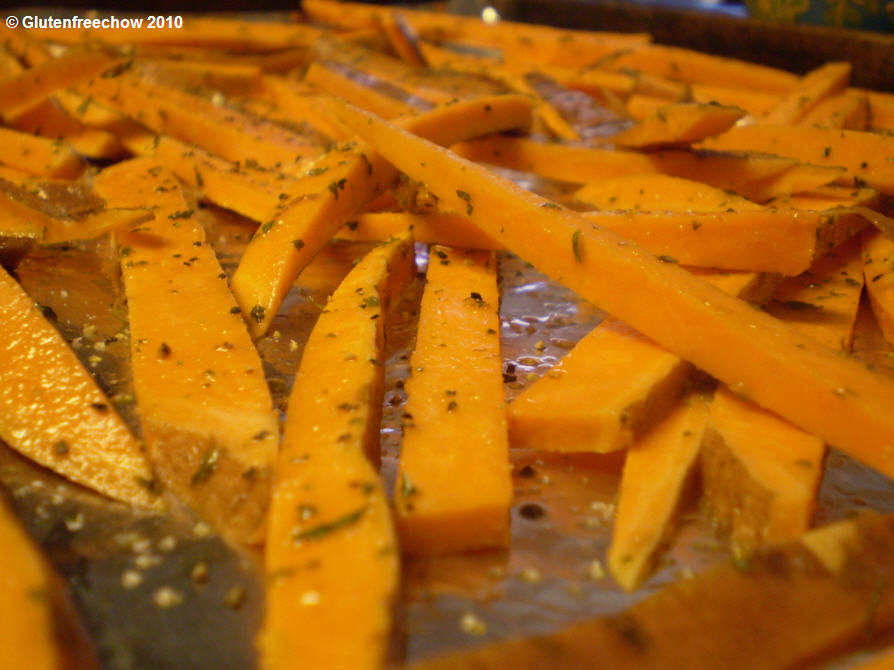
We have come a long way in our home in terms of the potato. I am even making these sweet potato fries, and they are eaten up with pleasure. They do not get super-crispy like a potato, but they do get crispy enough to be deemed, "Boy, these are good!"
These oven fries are delicious! Salty from the seasoning and sweet (from the potato naturally) they have a delicious flavor.

 
Serve with a chipotle mayo, or ketchup.

  •  3 medium sweet potatoes (I do not peel them, you can if you prefer not peel)
  • 1 tsp. garlic powder
  • 2 tsp. dried or fresh parsley
  • Salt and pepper
  • Olive oil to coat
  • Parmesan cheese (optional).

Heat oven to 425-degrees. Line a rimmed baking sheet with foil, shiny-side up on the foil. Spread some olive oil on the foil to prevent sticking.
Slice the sweet potato into this strips, a bit thinner than a yellow pencil.
Toss with olive oil, garlic powder, parsley, and season with salt and pepper.
Spread on the baking sheet in a single layer. Bake for 15-minutes, then using a spatula, turn them over. Bake for another 10-minutes, until they begin to brown.
Sprinkle with parmesean cheese at the end when they come out if you like.