Search This Blog

Showing posts with label Recipes. Show all posts

Tuesday, January 31, 2012

Green Curried Chicken...


This dish is easy Indian food at home! Plus, it takes so little time to prepare, you will agree, its better at home. This chicken curry is super healthful because it replaces the coconut milk (which can have a lot of fat) with other things that are really good for you, and--it tastes amazing!
Here is the recipe:


Ingredients:
  • 8 cups spinach
  • 1 cup chicken stock
  • 1 tbs garlic
  • 1 tbs ginger
  • 1 tsp salt
  • ¼ tsp black pepper
  • ¾ to 1 lb of chicken breast, cut into small chunks
  • 1.5 cups diced sweet potato (or carrot)
  • 4 scallions, chopped whites and greens
  • 1 8-oz container of plain yogurt
  • 1 tbs curry spice or paste
Directions:
In a blender, puree 8 cups spinach, garlic, salt, pepper and ginger. If it needs liquid to blend, add a tbs of water at a time to form a thick paste. Set aside.
In a medium sauté pan, over medium heat add sweet potatoes, scallions, curry spice, and chicken. Cook until chicken is about half cooked through. Add the stock and the spinach puree. Lid the pan and let simmer till chicken is cooked through.
Ladle into deep bowls and serve with a ¼ to ½ cup yogurt on top. 

I serve with these super healthful cumin spiced lentil flat breads (recipe below). Make these with lentil flour, or with chickpea flour to make them super healthful.
  • 2 cups lentil or chickpea flour (Bob's Red Mill would be a good one to use if you cannot find either of the others.
  • 2 tsp olive oil
  • 2 tsp salt
  • 1 tsp ground cumin
  • 1/4 tsp black pepper
  • Water (up to about 1/2 cup)


Blend all ingredients in a bowl with a fork. Add liquid 2 tbs at a time until it comes together into a dough. It should be soft enough to come together, but not too sticky.
Divide into 6-8 rounds.
One at a time roll out with a rolling pin onto cornstarch dusted wax paper (to keep it from sticking).
Cook on a dry skillet on medium heat until it begins to brown, flip and cook the other side.

Sunday, January 29, 2012

10-minute Homemade Tomato Soup


I know that canned soup is so affordable and convenient that you would wonder, "Why would I make my own?" (Well, it can sometimes be a challenge to find a canned soup without gluten.) But, this soup will make you answer that question with a resounding, "Because it's amazing!"
This tomato soup takes 10-minutes to make, and really that is the time it would take to pop a can open, and heat it in the microwave, right?
You probably have all or most of these items right in your pantry, so you can make it tonight!
This soup has a richness you just do not get from a canned version. Its dense and thick, rich and tangy, with a superb tomato taste that is not comparable to canned. And the few added ingredients I have in there give it just the right Umami (savoriness).
Then let's talk about the health factor of all the ingredients. The tomatoes have protein and fiber, and all those amazing antioxidants. Garlic, well--its great for the blood, and anchovies have the Omegas we all need. Its low in calorie, and fat.
I really encourage you to try this. 


Ingredients:

  • 1 28-oz can tomato puree (I use organic, no salt added)
  • 1 15-oz can diced tomatoes (I use organic, no salt or seasonings added)
  • 2 tbs garlic
  • ¼ cup basil leaves (fresh or dried)
  • 1 Tsp salt
  • ½ tsp pepper (this adds a nice warmth, reduce to a pinch if you like)
  • 2-3 anchovy fillets (or 1 tbs anchovy paste, or omit if you prefer) they melt away and you do not taste them, but they add a rich depth.
  • 2 tbs red wine vinegar (or any vinegar)


Directions:
Place all ingredients in a pot and using an immersion blender, blend until smooth. Or, if you don't have an immersion blender, place all items in a blender and blend until smooth. Transfer to a pot with a lid.
Cook over medium with lid on until it begins to simmer and simmer for 5 minutes.
Serve.

Serves four or so, or two large dinner bowls of soup. Serve with a nice crumbly gluten free cracker.

Tuesday, January 24, 2012

Kohlrabi Slaw...


We met about six years ago, me and kohlrabi. She showed up in my farmshare bag for the first time. Kohlrabi?! I had to look it up. I had never heard of it, and I had been around the vegetable patch, being a lifetime gardener and veggie lover. I didn't even know how to pronounce the name. Well, kohlrabi and me have had a wonderful time since then, once a year when it comes around. Its delicious. To try to describe it is unique...crunchy, but not quite as crunchy as celery, sweet, some almost as much as an apple--but without the tart, and juicy, in its own way. It really is one of a kind, but so delicious raw (great cooked too.)

Here is a super simple slaw for winter.

1 head raw kohlrabi, peeled and shredded (about 1.5 cups) using a mandolin, or you could use a food  
    processor (use cabbage if you cannot find kohlrabi)
2 small raw beets, peeled and shredded (about 1.5 cups)
1/2 cup parsley or cilantro, chopped


Dressing:
1/4 cup orange juice (fresh or packaged) or use vinegar of you want to, any kind.
1 tbs mustard
1 tbs GF soy sauce (Tamari)
1 tbs agave nectar (or honey)

Toss the shredded ingredients in a bowl, whisk the dressing in a another bowl, then combine. Salt and pepper to taste.

Notice there is no fat in this recipe, plus the ingredients are super-super healthy.
Use this as a side dish, or pile it on top of a turkey sandwich. Delicious!

Monday, January 16, 2012

Kale Chips...


I know, I know, you are thinking that 'chips' and kale should never be used in the same sentence, unless of course you happen to be saying, "I am going to have potato chips with my kale." Well, it's not true actually! Now, I know that the word "chips" evoke only those salty, crispy, crunchy things that have nothing to do with green, leafy winter greens. I know! But kale chips seem to be everywhere lately. A new fangled snack packed in my grocery, a recipe in Bon Appetit...so it was time to try them myself. And why not, after all it is big, leafy-green season here in AZ and each week my farmshare drops off more that we can saute, steam, simmer, and boil of those big bunches of greens.
I wondered just how good would these be? Turns out, kale has a structure that holds up to drying and makes them super crisp. These are wa-aay better than you would ever think, even I was a skeptic, and I am hooked.
They take on a roasty-toasty nutty flavor which is surprising. And they truly are shatteringly crunchy.

First, here is how to use them once made:
  • Eat as chips.
  • Crumble into salads or over plain pasta that is tossed with olive oil or butter and lemon juice.
  • Crumble into a creamy dip to add flavor dimension and nuttiness.
  • Crumble and put into a jar and use it like dried parsley in your dishes.
  • Throw a handful into soups, or stir into your favorite spaghetti sauce.

To make them:
Use as many bunches of kale as you like. I used two varieties that my farmshare grows; a curly kind, and a kind whose leaves have an oak-leafish shape. I am not sure of the names....but use the kale at your grocery.
  1. Wash your greens, and do not spin dry--your seasonings will stick to the moisture.
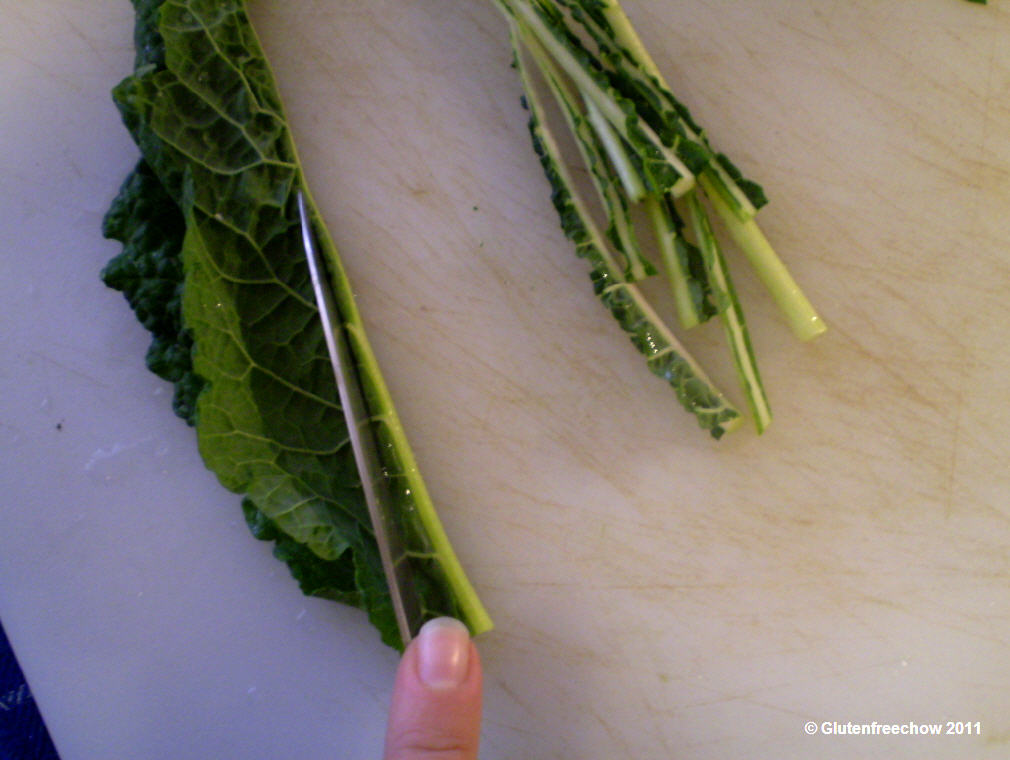
  2. Remove stems (see below).
  3. Tear into chip-sized pieces. They do not loose much size when they dry.
  4. Sprinkle them generously with seasoning. I used salt and pepper, and a sun-dried tomato seasoning I had hanging around. Garlic would be nice, or a parmesean, or lemon pepper...use what you like and have.
  5. Lay in loose multiple layers on your dehydtator trays.
  6. Dry for about 8-hours or until crisp. Rotate the trays often. (If using an oven, layer the same way on cookie sheets and  place it a 250-degrees oven until crisp, tossing gently to ensure even drying.)

Stems: If they have thick stems (and they will) trim them off. Fold the leaf in half and just make one cut to trim the stem.


Monday, December 19, 2011

Gingerbread Men...


Just in time for Christmas here is a gluten free recipe for gingerbread men.
This is super simple, and super delicious! These cookies are a delight, crisp-yet chewy...spicy and warm from the cinnamon and ginger. They just smell of Christmas. Roll the extra scraps out into thin rounds for a ginger-snaps. Or, use the same recipe, roll it thick and cut out shapes for houses...it makes great edible gingerbread houses.


Gingerbread Men
  • 1/2 cup molasses
  • 2 tablespoons honey
  • 1/2 cup white sugar
  • 1/2 cup water**
  • 1/4 cup vegetable oil
  • 3 cups Gluten Free flour
  • 1 tablespoon baking Powder
  • 1 tablespoon cinnamon
  • 2 tablespoons ground ginger

**Sometimes you never know how much  liquid GF flour holds, plus it depends on your climate. If the dough is too dry, add more water 1 tbs at a time at the end of mixing. If too sticky add more flour (sometimes up to 1/2 cup) to make it not sticky and workable.       

Directions:
 Preheat oven to 350 degrees.  In a mixing bowl, combine molasses, honey, water, sugar, cinnamon, ginger and oil. Mix to combine. Then add GF flour and baking powder. Dough should mix until it begins to come together and pull from the sides of the bowl. Adjust extra flour or water as noted above.
 On a generously floured surface, knead and roll out dough to 1/4 inch thick, then cut out shapes. Place shapes on a Parchment or a Silpat silicone baking sheet and bake for 10-12 minutes, or until dough becomes crisp, but not dark brown. It will get crisper as it cools.

Re-roll extra dough and cut again. Leftover scraps can be rolled into snakes and cut into ¼ bits and baked for a snack for the kids, or thin crisps as gingersnaps.

Cool on a baking sheet for 5 minutes, then move to a rack to finish cooling. When completely cool, decorate!

I personalized mine with initials, using small cutters in letter shapes. 

Sunday, December 18, 2011

Winter Greens Fettucine


Are you looking for a way to put more dark greens into your diet? If you aren't, well--you should. I didn't grow up on these greens, because I grew up in Arizona, they just weren't part of our food culture in the 70s-and 80s. Big, leafy, dark greens were not something that came to the weeknight dinner table in our house growing up. To my mother's credit, I am sure we wouldn't have eaten them (but only because we didn't understand them.) The nutritional value of these greens (kale, collards, mizuna, spinach, Swiss chard) are astounding. Too much to write about here, but you can look it up when you have time. This dish feels super light, even though it is loaded with dark greens. the Sauce is barely there with just enough tang and richness to be very satisfying.
Don't fear the amount of greens this dish calls for--it cooks down to the 4-servings that this dish makes. Trust me.

Ingredients: (Makes 4 dinner servings)

  • 16 cups loose packed winter greens** (any combination of kale, collards, mizuna, spinach, Swiss chard) Wash these and loosely tear or chop. Size and shape do not matter much. The water from the rinsing, helps them cook--so do not spin dry. (**Notes: this amount would be about 4 large bunches of these kinds of greens from the grocery or your farmshare. If using greens with tough stems--kale, Swiss chard--remove the spine and stems from the greens.) 
  • 2 tbs butter
  • 2 tbs olive oil
  • 5 tbs good balsamic
  • 1/4 tsp. red chile flake (use a pinch instead if you want less heat)
  • Salt and pepper to season
  • 1/4 cup grated or shaved parmesean cheese
  • 1 package of GF fettuccine noodles (or use regular GF spaghetti noddles)
Directions:
Cook the pasta according to package directions until al dente. Meanwhile, in a deep soup or stock pot, over medium-high heat, place the greens. Salt and pepper them to season. Cook the greens, turning them with a wooden spoon until they are all wilted down and cooked, about 6-8 minutes or so. There should be some liquid in the pot at the bottom, if not--add 1/4 cup of water to the pot. Once simmering, add the olive oil, butter, red chile flake and balsamic vinegar.
Drain the noodles and add to the greens in the pot. Turn the heat off and stir the noodles with the greens mixture until it is coated.
Serve in bowls and add 1-2 tbs of parmesean cheese on top.

Tuesday, November 22, 2011

Gluten Free Pie Crust


Its that time of year, time to be making your GF pie crusts for Thanksgiving Pies! Now, to go along with that--make a double batch of this pie crust, and with the extras, make GF Pastries from the Toaster (Pop Tarts!) That's right, Pop Tarts.
Not something I recommend to be eaten often, but that is what this season is about, right? The not-so-often indulgence of something unique and special and made once a year?


This pie crust recipe is tender and delicious...you won't be able to tell its GF. You really need to source a good GF flour for this though. I recommend Tom Sawyer. Or find a good rice flour blend that is flavor neutral (not tasting of beans or other flavors from the origin of the flour).


Recipe for GF Pie Crust
Makes enough for two 9-inch pie crusts

  •  2 1/2 cups Gluten free flour
  •  1 teaspoon kosher salt
  • 2 tbs sugar
  • 1 stick plus another  2/3 of a stick chilled unsalted butter, cut in small pieces
  • 6-8 tbs chilled ice water
  • 1 egg

Directions
Place flour, salt, and sugar in the bowl of a food processor, and process for a few seconds to combine.
Feed in butter, in chunks and process 10-12 short pulses.
After all butter is incorporated, add 6 tbs iced water and pulse again until it begins to come together. Add the egg, pulse again. If needed, Add more water, 1 tbs at a time until the dough pulls together into a course crumb.
Do not process for more than needed.
Turn dough out onto a work surface. Divide in two. Place each half on a sheet of plastic wrap. Flatten, and form two discs, then roll or press into pie pan. Or you can wrap, and refrigerate or freeze.
Ensure pie shells are well chilled before baking. Place in fridge if needed to chill for 30-minutes to an hour.

For Toaster Pastries:


  • Roll out pie crust into a 4x5 (approx.) size square
  • Fill with 3 tbs jam--whatever you love and have on hand
  • Top with a 2nd rectangle of dough (if when working with the dough, it begins to tear and be too soft, pop it in the fridge for 10 minutes to firm it up. It will become easy to work with again.)
  • Crimp edges with a fork, and poke a hole in the top.
  • Bake at 350 for 10-15 minutes. Check at 10-minutes, they are done when edges are golden.
Once completely cool, frost with a simple powdered sugar and vanilla icing. Mix 1/2 cup powdered sugar with a few drops of vanilla until the right icing consistency. Sprinkle or don't sprinkle!
These are work, and effort, but so worth it!

Monday, September 26, 2011

Weeknight Cioppino...

My husband and I are not stew or soup people. I'm not sure why...but we just aren't. Its one of the things that we are in complete culinary agreement on. So, I don't make soups or stews. But, the other night, on a whim for no reason at all really, I decided to make cioppino. I had two fishes in the fridge that I accidentally defrosted together, and wanted something other to do with them then steam or pan sear. Oh, and I needed something interesting to do with eggplant...its in season here you know, and if you read my blog, you know I cook in season what comes from the farmshare each week.
I hear this dish comes from fisherman on the docks in Italy. A working man's food. It makes sense to me, in the old village ports of Italy, that one might take what was left in the bottom of the boat at the end of the day, carry it home to his wife who would brilliantly, yet effortlessly make this incredible stew from scraps.
Whatever its origins, cioppino is a dish that is not often seen on menus in the American Southwest. Back east more perhaps, but not really here. It seems like a dish that could intimidate, taking hours to stew on the stove. But no, not this time. I created this for a weeknight meal. Pick up some fish this weekend and put on a pot.
This stew has a rich and thick tomato-y broth, that is earthy with that mild sweetness that comes from tomato, and a hint of warmth from the red pepper. The vegetables and the thick, flaky chunks of fish really leave you satisfied.


Ingredients
• 2 tablespoons olive oil
• 1 large onion, thinly sliced or diced
• 1 small eggplant cut into small dice (about 2 cups)
• Fresh or frozen green beans or peas (about 1.5 cups)
• Salt and pepper to taste
• 2 tbs. garlic, finely chopped
• 1 teaspoon dried crushed red pepper flakes (for medium, use less for less heat)
• 1 small can tomato paste
• 1 (15-ounce) can diced tomatoes in juice
• 4 cups stock or broth
• 3/4 pound fresh (or from frozen) salmon fillet cut into 1-inch cubes
• 1 pound fresh (or from frozen) wahoo or cod fillet cut into 1-inch cubes (or any firm white fish, like halibut)

Directions

Heat the oil in a large, deep pot over medium high heat. Add the onion, and eggplant and sauté until the onion is translucent, about 10 minutes. Season with salt and pepper. Add the garlic and 3/4 teaspoon of red pepper flakes, and sauté 2 more minutes. Stir in the tomato paste. Add tomatoes with their juices and the stock. Cover, reduce heat to medium-low and simmer for about 5 minutes.

Add the chunks of fish to the pot and cover and cook until the fish is cooked through, about another 5-7 minutes. Add the green beans or peas. Simmer for another minute Season generously with salt and pepper to taste..

Ladle the soup into bowls and serve with GF crackers or toasted GF bread. I garnished with diced celery, a dollop of sour cream and cilantro.

Wednesday, September 21, 2011

Morning Banana Bran Muffins...

Just ask my husband, I am always trying out new recipe for a morning breakfast on the go. Something that packs a bigger nutritional punch than you might expect, in a small and healthy package, oh--and that tastes mighty good. Why? Probably because I am the ever-multi-tasker...never settling for doing one thing, when I can do three at the same time. That is why I like these. Nutrition (full of good stuff)+fast-food (my version anyway, I made them Saturday and they last me all week.)+yumminess (they taste really good)+convenience (it fits in my purse with my yogurt and plum!).
This muffin is my latest invention, and it's delicious! I pair it with a homemade yogurt and a piece of fruit and I have a morning breakfast that is about 400 calories (just right) full of nutritional goodies and goodness and--I dont even think about food till well into the lunch time hour (it keeps you satisfied for a long time.)

 
And the nutritional value--more goodness than usual for such a small, but mighty little muffin!
It gives you good fat, potassium, fiber, and protein! And about 192 calories per muffin.

 
These muffins are dense, yet super moist and chewey. The almonds give crunch, the coconut a satisfying chew, and the chocolate chips and 'just sweet-enough' edge to these. when you eat one, microwave for 15-seconds if right from the fridge, and they will taste right from the oven. Use raisins if you prefer not to have chocolate in your breakfast muffin.

Ingredients:
  •  ¾ cup oat bran
  • ¼ cup ground flax meal
  • 2 tsp. baking powder
  • 1.5 tsp. cinnamon
  • ½ tsp. salt
  • 1 cup of buttermilk
  • 2 small eggs
  • 2 tbs olive or vegetable oil
  • 2 large bananas, mashed
  • 1 cup chopped almonds
  • 1 cup GF flour blend
  • ¾ cup coconut (not sweetened)
  • ¼ cup molasses
  • ¼ cup brown sugar
  • 1 cup dark chocolate chips (at least 60%, more is better for more you) (or use raisins if you dont want to use chocolate)

Preheat oven to 425F. Line 18 muffin cups with paper liners. Place all ingredients in a large mixing bowl with a whisk attachment. Blend together until well mixed. Spoon mixture into muffin cups filling almost full. Bake 15-17 minutes.

Sunday, September 4, 2011

Faster than take-out Shrimp in Mushroom Sauce

This is a dish that took me 28-minutes end to end. That is faster than takeout any day! Its delicious and hearty, without being laden with meat...shrimp is the protein here.
Don't be daunted by the ingredients list, its mostly items you have, and just a few you will need to add to your grocery list for the week to pick up so you can make this next Monday night.
We use shrimp in this, because it lends itself perfectly to the flavors. Since we only buy domestic, wild shrimp (when it is on sale), we don't get this treat often, so when we do—we want to do something really great with it. Tomatoes are an unexpected ingredient in this stir fry dish, but they add a delicious tangy-sweet component to the dish. The cool and crunchy, raw cucumber is a wonderful cooling contrast to the slightly sweet, and earthy-rich mushroom sauce.

Main dish:
  • 1 lb. raw (or frozen) shrimp
  • 1 oz. package dried shitake mushrooms (check your Asian food isle)
  • 2 cups (or so) grape or cherry tomatoes
  • 1 red bell pepper, cut into thin strips
  • 1/4 to 1/2 cup edamame beans (not in the shell)
  • 1 cup cucumber, chopped into large pieces
  • 1/3 cup fresh, chopped cilantro
  • About 4 oz of GF rice noodle (like Thai Kitchen brand)
  • Salt and pepper
  • Olive oil

Sauce:
  • Water
  • 1/4 GF Tamari (GF soy) sauce
  • 1/4 cup GF Worcestershire sauce
  • 1/4 brown sugar
  • 2 tbs corn starch
  • 1 tbs vinegar (any kind)
Start a teapot with about 4 cups of water until it boils. Place rice noodles and dried shitakes in a large glass bowl. When the teapot boils, pour the liquid over the noodles and mushrooms. Using a wooden spoon, push the noodles and mushrooms underwater to submerge. Cover with a dishtowel and let sit. In a large saute pan, over medium-high heat, add 1 tbs olive oil and saute the edamame, tomatoes, and red bell pepper until it begins to soften, about 5 minutes. Return to the noddles. The water will have taken on a brownish color and flavor of the mushroom, creating a mushroom broth. Using tongs, retrieve the mushrooms from the bowl of noodles and add to the saute pan. Cover the noodles again. Saute the vegetables another 2-3 minutes. Then, add the raw shrimp. Cook the shrimp until they are about 1/2 way cooked (you can still see some grayish part, and they are not all the way pink). Return again to the noddles, they should be soft by now in the water. To the noodle water and noodles add the brown sugar, Worcestershire, GF soy sauce and corn starch. Stir to mix. Add the noddle mixtrue to the pan of vegetables and mushrroms. and stir to combine. The liquid will begin to simmer and as soon as it does, it will thicken into a thick glossy sauce. Season generaously with salt and pepper (to taste.) When the sauce is as thick as you like it, dish it into bowls. Top the hot rice noddles and sauce with the raw cucumbers and cilantro. Serve.

Monday, August 29, 2011

Sweet and Sour Meatballs

I was raised in what I call the Betty Crocker kitchen. My mother, being an exceptional wife to my dad and and even better mother of young children in the '70s and '80s made dinner each and every night. ...And we sat around the table as a family and had dinner! (A lost art it seems.)

While not a gourmet cook, my mother was an excellent cook. And many of her dishes were the quintessential ‘Betty Crocker’ recipes. You know, the ones that came out of the red and white checked, wire spiral bound book? The ones that included two descriptive adjectives connected with an ‘and,’ or that often ended in a ‘bake.' Cheese and bacon get-togethers, chicken and broccoli casserole, Louisiana shrimp bake…and these gems—sweet and sour meatballs.

I loved these growing up. Coming home from school to meet the sour-sweet smell coming from the Crockpot, wafting through the door when I would walk in.

My mom made these with beef and served it over white rice. I use ground chicken or ground turkey or a mix—use what you like. While there are not a lot of ingredients, and some come from a can, as most of Betty's did in the day, you can choose to use fresh ingredients if you choose.

This is so easy, all the ingredients into the Crockpot and, come dinner time you have a sweet and sour and savory dish with a luscious sauce full of caramelized pineapple and juicy meatballs. Its childhood heaven in a bowl. I garnish with cilantro, something my mother didn't do, but it plays well off the Asian flavors of the dish.

Ingredients:
  • 1 lb. ground meat (lean beef, chicken, turkey or mix)
  • 1/2 GF cracker crumb, or bread crumb (use GF crackers, or even GF pretzels-whatever you have to crush into crumb)
  • 1 small egg
  • 1 15-oz can crushed pineapple with its juice
  • 3 tbs vinegar (any kind)
  • 3 tbs GF soy sauce
  • 1/3 cup (not packed) brown sugar (or use agave, but use 1/4 less)
  • 3 tbs. corn starch 
  • 1 medium bell pepper cut into large dice
  • Salt and pepper
Blend ground meat, egg, bread crumb and salt and pepper (few pinches of each) until mixed. Form into meatballs the size of golf balls. Set aside.
Into the Crockpot add: the pineapple with juice, the GF soy sauce, vinegar, brown sugar, cornstarch, and bell pepper. Stir until blended and the cornstarch is mixed in. Lay the meatballs on top of the sauce and lid the Crockpot. Cook on low for up to 8 hours. Cook on high shorter.
Serve over a brown rice or other grain, like millet or quinoa.

Sunday, August 21, 2011

Eggplant and Artichoke Penne

Vegetarian night came early this week, Sunday lunch. Its eggplant season with my farmshare, so we have it in abundance! We had no meat defrosted, so lunch was this. The eggplant and onion, when sauteed on high heat take on a caramelized, nutty, roasty note. This recipe will serve 4, or 2—with leftovers enough for lunch at work next week.

Ingredients:
  • 1 box or bag of GF penne pasta
  • 1 medium eggplant, cubed or diced small (about 4 cups)
  • 1 medium onion, any kind, diced (we used a combo of shallot, white, and Italian red onion, because we had them, use what you have and like.)
  • 4 cloves garlic, minced
  • 1 can artichoke hearts, drained
  • 1/2 cup fresh basil, shredded or chopped
  • Pats of butter, or olive oil
  • Parmesan cheese
  • Salt and pepper
Directions:
Cook your pasta according to package directions. While its cooking, in a medium or large saute pan add 2 tsp. olive oil and over high heat saute your onion, garlic, artichoke and eggplant. Salt and pepper to season it. Stir often as it cooks. It will begin to caramelize and brown, then after a few minutes some of the moisture will come out and the vegetables will begin to become soft. Continue to cook until soft. If it looks too dry, add 1 tbs water to the pan to deglaze and prevent burning. When soft, turn off the heat.
To serve, dish a serving of penne into a bowl, and add a pat of butter (use olive oil if you don't want to use butter, about 1 tsp.) Toss the butter or oil with the penne to coat. Then top with the eggplant saute mixture. Add a sprinkling of basil, and we like to add Parmesan cheese to the top. Season with salt and pepper to taste.

Monday, August 1, 2011

Gluten Free Monday Night Cornbread...

Cornbread is gluten free, naturally. Did you know that? I didn't for years. I thought that cornbread had to be a blend of wheat flour and that the corn meal was there merely as an accessory to the wheat. Well, the truth is cornbread can be made solely with corn meal! I was enlightened one evening a year or more back when Alton Brown on the food network made a cornbread this way.
My recipe is inspiration from his. And its so easy, easy enough that it can be a Monday night side dish to whatever you have going on. It doesn't even take a mixer, just your grandmothers wooden spoon and a bowl. If you have all the ingredients in the pantry (and you should), it takes literally 6 minutes to combine, then it bakes for 20 while you prepare anything else you are having.
The corn meal gives the cornbread an incredible corn flavor that is very pronounced. The corm meal alone lends a crumbly chewiness to the bread, while some of the corn meal bits have a satisfying crunch. The corn kernels in the cornbread offer a sweet pop as you enjoy it dripping (or lightly) buttered. The bottom is golden and crisp with that chewy browned goodness you only get from a cast iron skillet (more on that in a minute).
Here is the recipe:

Ingredients
• 2 cups yellow cornmeal
• 1 teaspoon kosher salt
• 1 tablespoon sugar
• 2 teaspoons baking powder
• 1/2 teaspoon baking soda
• 1 cup buttermilk (if you don't have, use milk)
• 2 eggs
• 1 can creamed corn. Or use kernel corn-drained.
• 4 tablespoons oil (olive or canola), divided
• 1 tsp. black pepper

Directions
Preheat oven to 425 degrees. Place a 10-inch cast iron skillet into the oven to heat. In a large bowl, combine the buttermilk, 2 tbs oil, eggs, and corn, whisking together to combine. Then add the cornmeal, salt, pepper, sugar, baking powder, and baking soda and stir to combine.
Open the oven and bring the hot cast iron skillet out and place on top of stove. Add 2 tbs oil to the hot cast iron skillet. Immediately pour the batter into the skillet. Immediately return to the oven and bake until the cornbread is golden brown and springs back in the center upon the touch, about 20 minutes.

About cast iron skillets: invest in one. Nothing makes a perfectly charred, golden, brown crust better then a cast iron skillet—on everything. From asparagus to steak to chicken breast, the cast iron skillet cannot compare to any other cooking vessel. It goes from stove top to oven, is naturally non-stick once seasoned, and makes the best crusts on the underside of corn bread.

Sunday, July 10, 2011

Gluten Free Peanut Butter Cookies...

These peanut butter cookies are a treat, they do after all have sugar in them. But factor in the high protein value from the peanuts and the eggs, and we could call these good for you.

These are super simple, and turn out really delicious. They come together in 10 minutes, and bake in 15! They are not quite like your traditional peanut butter cookie—these possess a soft, chewy interior, with a crisp outside—I recommend, make a double-batch.

  • 1 1/4 cups white sugar
  • 1 cup natural peanut butter (creamy or chunky)
  • 2 large eggs
  • 1 cup of Gluten Free Flour (any blend you prefer, I use Tom Sawyer)
  • 1/4 to 1/2 cup chopped peanuts (use the larger amount if you like super chunky)
  • 1 tsp. baking soda
  • 1 tsp vanilla extract
  • Pinch of salt

Preheat oven to 350-degrees. Using a mixer, blend together peanut butter and sugar. Slowly add the eggs beating well after each one. Mix in the vanilla. Then add the flour, baking soda, and salt. Finally, add the peanuts. This dough will be firm and sticky.

Place balls of dough about 1-inch in diameter on a parchment lined baking sheet. Press the balls flat with the palm of your hand dipped in white sugar (this keeps your palm from sticking to the dough, and form a nice sugary crust on the top of he cookie.)

Bake for 15-minutes until the edges just start to slightly brown. Remove from oven, and then immediately remove from parchment on to a rack to cool.

Friday, July 1, 2011

Dark-Green Asian Salad

Our farmshare season of dark greens recently ended. We are now in the world of zucchini, look for some recipes with that to come!! But, I would call this a new way with dark-greens. A while back, I needed a dish for a work potluck, and so I looked in my farmshare bag. Lots of dark greens! It was that season you know. But “Kale Salad” on the potluck buffet is not what I think most of my coworkers would find very appealing. I knew that I needed to make it really delicious.

Dark greens, with their bitter edge, lend themselves nicely to a vinegary bite. So a nice vinaigrette, with a sweet note (to tame the bitterness) would go nicely, I thought. And it needed a name that sounded good. Dark-green Asian Salad seemed to be less intimidating than Kale Salad, so that is what I went with.
Many people only cook with these dark greens, kale, broccoli, and others, eating them steamed, boiled, or sauteed. This raw usage of them is really good, and the textures—the crunch of the broccoli—and the lettuce-like crispness of the kale, really blend well together. It turned out quite delicious. Dress it just before serving!

If you want more greens in your diet and just don't know how to do it. This is it for sure! The best part? leftovers of the salad go right into tomorrow night's stir fry, dressing and all, and gets re-purposed beautifully into an entirely new dish.

Salad:
  • 5 cups chopped kale, or baby kale
  • 4 cups of Mizuna leaves, chopped (or spinach or dark green lettuce)
  • 3-4 cups chopped broccoli heads and stalks
  • ¼ cup candied (crystallized) ginger, diced
  • 3 tbs sesame seeds
  • ¼ to 1/3 cup chopped peanuts
Dressing
  • 2 tbs honey or agave
  • 2 tbs water
  • 3 tbs Worcestershire
  • 3 tbs yellow mustard
  • 1 tbs vinegar
  • 2 tbs oil (use a chili pepper oil for nice heat kick)
  • Salt and pepper

Saturday, June 4, 2011

Baked eggs...

On a slow Saturday morning, baked eggs are a great start. I like these eggs, because the prep is so easy...and while they bake, you can do other things. This is for two, scale up in eggs and pan for more people.
Here is how they go:

Preheat oven to 400-degrees.
Scramble 4 eggs in a bowl. (My friend gave me these from her chickens, the speckled one is a turkey egg!)

Or, if you prefer a sunny-side egg, crack them whole into the pan, works both ways.

Prep some additional ingredients that you like in your eggs. My fridge produced GF sliced ham (about 1/2 cup or so), and some good cheese (about 2-3 ounces, cubed up.)
My garden produced some nice tomatoes and fresh basil (about 1/3 cup tomatoes and 1/4 cup basil leaves.)

In a skillet (one that is oven proof with an oven proof handle, because this will go into the oven) place 1 tbs. olive oil. Heat on medium, then add the eggs. Let the eggs cook until they begin to set on the bottom, about 2 minutes. Using a spatula, pull the eggs from the edge of the pan a bit and swirl around.
Now, add the ham, cheese, and tomatoes on top of the partially cooked eggs.
Then, place the whole pan into the oven. Set a timer for 7 minutes.

Here is the good part—while the eggs bake, make your French Press coffee, and butter your toast.
When the timer dings, the eggs will be puffy and moist and delicious. Add the fresh basil, and a spray of salt and pepper. Breakfast. So simple, for a slow Saturday morning.

Saturday, April 2, 2011

New way with greens....tacos!

Seems the trend lately is for people to try to fit more dark greens into their diet. This can be a challenge to do with variety, as greens sometimes can only be prepared one or two ways.
We made these for a Saturday night dinner and I think it is a truly delicious, and successful way to incorporate dark greens. I am not sure if they are a lettuce wrap, or a taco...I suppose you could swing the terminology to fit whatever might sound most appealing to your family. We sauteed up some veggies and chicken, filled the large leaves of Swiss Chard, and rolled them up like a taco!
We used veggies we had; kohlrabi, fennel, green onion, the red Swiss Chard stems, and canned-diced tomatoes (our garden ones aren't ripe yet). But you could use more conventional veggies, like green peppers, onions, and red peppers and it would be equally delicious. We added some cumin-rubbed chicken, baked then diced, and voila! Delicious tacos!
Paired with some fresh radishes plucked from our garden and good Kosher salt--Dinner!
Either way you decide to enjoy them, make these up any night of the week!

  • 2-3 large Swiss Chard, or collard leaves per person (try to find ones about the size of a large hand, or larger.)
  • 4 cups sliced veggies
  • 2 baked chicken breasts (seasoned with cumin then diced) ** or keep this vegetarian and use 2 cups of mushrooms**
  • Greek yogurt or light sour cream to garnish
Bake your chicken, the dice. Then saute your veggies until tender. Do this over high heat to get some good caramelized color to them. Then, add the chicken to the cooked veggies and fill, wrap, (dollop sour cream or yogurt if you like) then roll and eat!

Monday, March 28, 2011

Spring Asian-Slaw

Sometimes I wonder if our food cravings don't come from more of a texture desire, than a taste desire. Like, a simple Saturday lunch on the patio—cool breeze blowing, the bees buzzing all over the lavender—lunch is a simple tuna sandwich on gluten free bread, and my husband wanted chips to go with it.
Was it the chip he really wanted? Or was it the satisfying crunch, the salty-tangy bite, the crispy texture? This slaw had all of that, so instead of chips, we had this slaw. Definitely more intentional on the wellness food quotient than the chips will ever be.
Asian-inspired flavors tend to be overused sometimes, but I really do think they lend themselves to slaw.
This one is so easy, the soy gives it that satisfying Umami edge, and the peanut throughout is this subtle hint of Thai flavor that pings your tongue about every other bite. Plus, it is all about what is in your pantry that you have to use. Leave out the items you don't have, or substitute.
Here is how it is done:
Slaw
  • 2 cups shredded cabbage (red or green)
  • 1/4 cup chopped cilantro or parsley
  • 2 tbs chopped peanuts
  • 1 tbs sesame seeds
  • 2 tbs pickle relish or chopped pickles
  • Salt
  • 1 tsp celery seed
Dressing:
  • 1 tbs gluten free soy sauce
  • 2 tbs mustard (spice, honey, yellow—any kind)
  • 2 tbs vinegar
  • Splash of agave (or more to adjust to your sweetness)
  • Squeeze of orange juice from an orange, or splash of orange juice
  • Hot chili paste (to taste, but optional)
Toss the slaw ingredients, and season with salt. Mix the dressing together with a whisk, and pour over. Toss well. It is good after sitting about ten minutes, or more is ok.

Leftover slaw: put a pork roast in the crock pot the next day, and make pulled pork sandwiches with this slaw on top!

Saturday, February 26, 2011

Gluten Free Cinnamon Buns...

I awoke this morning to an overcast rainy day (one that was supposed to be sunny and nice mind you, as I had a garden party planned) and in all AZ's 364 sunny days a year, the one day I needed was gloomy. So, in my rebellion I decided I needed a gooey, warm cinnamon roll in protest to what should have been a glorious Saturday for gardening.
Here was my result—these really let you experience a true cinnamon bun experience like you remember (from before your gf-days).
They peel apart, layer by layer, to reveal the center most gooey heart of the roll. They have all the softness of a non-gf roll, with a bit of a chewy, crusty edge on the outside. The insides are gooey, and outside is oozy with the warm glaze (finger-lickers)...

Rolls:
  • 2 cups Tom Sawyer GF flour (I have only used Tom’s and get the best results. Try your own GF flour and tell me how they turn out).
  • 4 tablespoons sugar
  • 1 tablespoon baking powder
  • ¾ teaspoon kosher salt
  • 8 tablespoons cold unsalted butter, cut into very small pieces
  • 1 cup buttermilk (or try milk, or cream, or half-n-half)
Filling:
  • 3 tbs butter, melted
  • ¼ cup cinnamon
  • ¼ cup white sugar
Optional add-ins:
  • Chopped nuts like Pecans (up to 1/2 cup)
  • Brown sugar (up to ¼ cup)
  • Raisins (up to ¼ cup)

Directions:
Preheat oven to 400°.  In a mixer with the whisk attachment, mix together flour, sugar, baking powder, and salt. Add the small diced butter and let the mixer run to cut the butter into the flour. The butter should be in smaller than pea sized pieces. Add buttermilk and blend until just combined. Dough should not be too ‘sticky’. If it is, add a little more flour until it isn’t sticky, but has come together.

Place dough onto a cool surface and pat out into a rectangle shape. Brush with melted butter (liberally) and sprinkle with the cinnamon sugar (liberally—the more the better I found). You can add in any optional items to make them even more gooey, and yummy if you like those items.
Then, gingerly roll the dough up. The dough is tender and it may be more of a ‘fold’ but you get the idea.

Then slice into thick rounds, and place on a cookie sheet, either non-stick or on parchment. I brushed mine with more melted butter on top and then baked! Try 15-minutes (depending on your oven). They will just begin to slightly brown on top and they are done.


While they bake, make the glaze.

Glaze:
  • 4 tbs cream cheese
  • 1.5 cups of powdered sugar
  • 1 tsp vanilla
  • Drizzle in enough milk to make a thick glaze
Put it all in a mixer and let it go. Add enough liquid to make it as thick or thin as you like.
Eat right from the oven while warm with glaze on top.

Thursday, February 17, 2011

Homeade Salad Dressing Mix...

Does your spice cabinet look like mine? I am willing to guess it does. More of a spice cave, my dark pantry shelf is crammed with every spice imaginable.
Like you...I am often wooed at the store by a beautiful jar of herby mystery, "What does that taste like?", or the whole jar of herb you bought for the recipe you made once that took a 1/4 tsp of the herb. An now it sits there on the shelf, feeling left-out and neglected as you reach again and again for the Parsley jar next to it. Not that Parsley is the best herb in the shack, but its familiar, so it gets used. We have all been there.
So what to do with all those herbs and spices? I make salad dressing mixes. Its a great way to use up all those herbs, and making salad dressing is so easy, that if using a mix—we all know its even easier!
With a repertoire of a few different dressing bases, and a few of your own pre-made mixes—all prepared with items you already have, well, you can become the new foodie genius on the block. Gosh, if you make a few batches and packages it, say, as a hostess gift to your next dinner party, well—people may just start calling you Martha.

Mixes:
Ranch Mix/Italian Mix
(Mix with creamy base for Ranch, or with vinaigrette base for Italian)
  • 1 tbs dried parsley
  • 1 tbs dried oregano
  • 1 tsp dried onion or garlic flake (powder may be used)
  • 1 tsp celery seed
  • 1 tsp dried shallot (optional if you do not have)
  • 1 tsp pepper
  • 1/2 tsp kosher salt
Poppy Seed Mix:
(Mix with any base)
  • 1 tbs lemon pepper
  • 2 tbs poppy seed
  • 1 tbs parsley
  • 1/2 tsp kosher salt
I like to blend mine in a mortal and pestle, I like the manual labor of it, and the aroma of the spices and herbs wafting up as I grind them in the bowl. But you can leave your herbs and spices as they are, or whir them for a few seconds in a mini-food chopper.

Then add the mix to a base! Its simple, 1 tbs mix to 1 cup of base. Scale up for larger batches!

Creamy Base
  • 1/4 cup sour cream
  • 3/4 cup buttermilk, or milk
  • 1 tsp mustard (any kind)
Lite-Creamy Base
  • 1/4 cup buttermilk
  • 3/4 cup plain yogurt or Greek yogurt
  • 1 tsp mustard (any kind)
Vinaigrette
  • 1/3 cup lemon juice or vinegar (any kind)
  • 2/3 cup olive oil
  • 1 tsp mustard (any kind)